Showing posts with label Buildout. Show all posts

Monday, June 9, 2014

The Finished Bathroom!

The bathroom is finished- it took exactly 4 WEEKS so I think we did pretty good... oh and Nathan started a new job in there at some point- he's a trooper! I finally had time this weekend to take some After photos... or else I would have posted this much sooner! Here she is in all of her clean and fresh glory... aka EXACTLY what I was wanting!
 
(You can check out the previous bathroom posts here- Demo, New Layout & Drywall, Tub & Tile, Floor TilePaint & Storage, Board and Batten, Lighting & Mirror )
 
 
And here's a ton of Before and Afters- the best part about makeovers!


Just a reminder of how the layout was before....


And here is the finished layout...


One of the best parts of the bathroom ended up being the storage behind the toilet. We are still planning on installing doors to cover the top two shelves. It looks pretty now, but I'm really needing some closed storage for my random colored towels and odds and ends. The bottom shelf will remain open.

Until we get the doors, I'm enjoying the open shelving and its prettiness.


The board and batten is one of my favorite parts of the bathroom- and one of the easiest to do.


The vanity was a Craigslist buy. We thought it was originally 'white' but when we put the 'very white' vanity top on, we realized it was more of an ivory color and was not working at all! All different kinds of whites and ivories are a bad combo. I took on the vanity project and ended up painting the vanity the same color as the walls- Valspar "Bay Waves". (We had the paint already so again it was an easy decision). I'm really glad we painted it because it breaks up the white, but is still very subtle.


I LOVE the vanity- I was really wanting something that looked more like furniture, so when this came up on Craigslist- we negotiated right away and were on our way to pick it up. There are some doors that need adjusting if you look closely, but it's serving it's function and looking pretty.
 
We also replaced the knobs- these are a cheapo brand from Lowes!


Speaking of vanity top- ours is from Lowe's. Nathan's parents used this same top for their bathroom renovation and I knew that this is what we would use the first time I saw it. The clean lines are great and it also doesn't have a backsplash that a lot of the vanity tops have. It just sits right up against the wall which helps the vanity have more of that furniture look. (It's the little things!) I love how the modern top contrasts with the classic style faucet. (Aquasource faucet from Lowes).


Yep- I love this faucet.


Enough pics of the sink. Home Depot Martha Stewart sconces above the mirror...


Some $4 coat hooks were added to the board and batten. Great accessories to pull in the polished look.


 Basket was a TJ Maxx find.


The tub has proven to be the hardest area to take pictures due to no natural light... but it's also my favorite place in the room since I use it so much :)


Why not a few more Before and Afters? So glad we took out that window! I do not miss it... other than when I need some sunlight to take blog pictures of the bathroom... but I don't foresee myself taking much more of these any time soon.


And that is the bathroom! I can't believe it's done. I am still needing some artwork on the walls, but I hate hanging things up for the sake of filling room. I'd rather have a blank wall then something I don't like... so I'm on the search.
 
Sometimes I walk in and forget that it's not this....


 ....but it's THIS! And done just in time for baby :) Thank God!!!!


Finishing up the nursery this week- hoping to post one big post soon, but who knows- this baby may come before any post goes up. We shall see! 
 
-Tricia 

Sunday, May 4, 2014

The Bathroom Gets a New Layout

I'm so excited to say that the bathroom is coming right along- relatively speaking it's probably one of our quickest projects to date. I'm especially thankful for such a hard working husband and helpful father in law who have kept this project moving. I think Nathan's speed and dedication is due to the fact that he probably doesn't want to witness his preggo wife have another emotional Jessie Spano "There's No Time... There's Never Any Time" breakdown. I've only had 2 during the bath reno so far but hoping I'm in the clear.


Before I get to the good stuff like tile and grout and paint (Yes that is the GOOD stuff), I've got to get down to the bread and butter of the project. To truly appreciate it, you have to know all that has been involved. The bathroom isn't just a facelift- it's a full tear out and switcheroo of everything. The old layout did not utilize the space well at all. The bathroom is actually quite large- especially for a house this old- so we are lucky to be able to work with a lot of real estate.
 
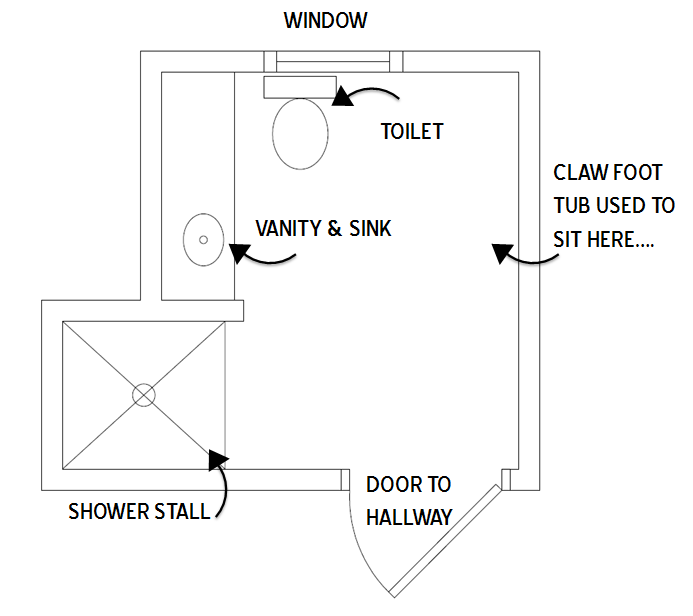
Below is a simple plan of what the bathroom was like before.
 
BEFORE
 
 
As you can see, half of the bathroom wasn't even utilized. Granted- we did take out the claw foot tub which took up a lot of the room, but we were left with a toilet practically sitting on top of the sink (You could seriously wash your hands while on the toilet. I swear I never did that though... not to say others haven't....), a vanity that wasn't able to be fully utilized or accessed due to the placement of the toilet, and a small shower stall in the corner. If I had to guess what the original layout was back in the day, I would assume that the toilet was where the shower stall is and the vanity and claw foot tub were where they are shown above. At some point the previous owners wanted a shower stall in addition to their tub, and just moved the toilet to the only place available- right smack in front of the vanity.


My vision for the new plan was pretty straight forward from the beginning. The main goal was to get rid of the nasty shower stall and install a tub/shower combo for kiddos, resell value, and practicality. We thought about simpler options like keeping the vanity where it was and going back to the original 1920s layout, but it just made sense (although maybe a little more work) to put the new tub where the old vanity was, move the toilet to the old shower stall area, and place a new vanity where the claw foot tub used to be. Had we put a new tub where the old claw foot used to sit, we would have probably had to build out a wall to enclose it and it would have made the bathroom feel very closed in. You also would have entered the room and be straight smack in front of a new wall... and I didn't like the thought of that. So, extending the original wall on the opposite side just made sense.  Now is the point that you are probably confused. If so, just look at the new layout below.
 
AFTER
 
Hope the new layout above is clearer than my rambling. We feel like it's a much better use of the space and it just feels right when you walk into the bath. It's a little tight between the tub and the vanity, but it's actually not out of the ordinary of a normal bathroom- I think we are just used to such an open room that it's a bit of a shock for us to have a normal layout. One thing that we are adding which I'm really excited about is the closed storage- aka linen closet- behind the toilet. We currently don't have a linen closet- just the hall closet that is already filled to the brim with random things- so it was really necessary for us to add in some storage.
 
Another thing we did was board up the window. I know I know! I would never normally take a window out of a room BUT we had good reason. The window would have cut directly into the new tub area and made everything look completely unbalanced. It could have worked, but we would have had a ghetto shower rod up against a window (that could never open) and then we would have half of a window in our shower. MOST OF ALL, the window is literally 4 feet away from our neighbor's house- which means it's 4 feet away from our neighbor's window. Needless to say, our blinds were never open when the window was there- in fact sometimes I forgot we even had a window in our bathroom. It was never used and even if it was the natural light was minimal since the house next door pretty much blocked any semblance of sunlight.  Operation 'board up that window' was a no brainer and  neither of us are regretting the choice at all.
 
Below's pic shows the window before demo. I guess I was really bad about taking "During the Reno" pics since this is the only one I could find before it was drywalled over.
 

After our Demo (which you can read here), the guys reworked all of the plumbing- which is pretty impressive if you ask me (Sorry no pics of that...) The basement ceiling is now a maze of new white piping- it's pretty awesome. Nathan also ran electrical to the wall that will be housing the new vanity.
  
 
We also extended the wall out so we could enclose the new tub (where the vanity used to sit)... which then led us to laying concrete board on the floor... 
 
 
And installing the new tub! It's in- it's really in! (and yes these are the worst iPhone pics ever)


Drywall was then installed.... Josh was a huge help with this part- he can do it with his eyes closed!
 
This is where the toilet and closed storage are going.
 
Future vanity wall


And then concrete board was installed around the tub....


And that's where I will leave you- Plumbing, electrical, tub install, drywall, concrete board... This post sums up about a week and a half of very hard work. I guess I could have spread it out, but just getting a blog post up is work enough.  The fun stuff (for me anyway) will be coming up in the next bathroom post- stay tuned!  
 
-Tricia