Showing posts with label Electrical. Show all posts

Tuesday, June 3, 2014

Boarding It Up!

Once the baseboards and storage were in, it was time to take on the lower portion of the walls. As I said here, we painted just the top portion of the wall gray because board and batten was planned for the lower half.
 
We took 4.25" wide boards and nailed them in horizontally. To determine the height of the placement, we just determined what looked right to us… but it also helped to use the light switch location as a guide- we just put it in an inch above it.


After the horizontals were nailed in, we took 3" wide boards and installed them about every 15" inches. Some areas aren't spaced exactly 15" apart because they either needed to be closer or further apart to make it all look visually balanced with its surroundings. A lot of it was "eyed" and it ended up working out great.


After all of the boards were nailed in- I spackled and Nathan caulked. Once the caulk was dry we smacked on a few coats of "Clean White" paint by Valspar and it was done! Board and batten is one of the quickest projects we've done.


The look of the board and batten really made such a big difference in the bathroom. When my friend was visiting last weekend, she said it helped make the room look even taller than what it is and I would have to agree with her.
 
 
This was one of those steps that could have easily been skipped, but I think the minimal time and effort was beyond worth it… probably my 2nd favorite thing about the bathroom! 
 
You may have also noticed the mirror in some of the pictures above. We actually used the same mirror that came from the old bathroom. It was probably the ONLY THING we saved. The mirror was in perfectly good shape. Nathan just used a glass cutter to cut it down to the size we needed.


We also ran electrical up the new vanity wall for some new outlets and lighting. 


Staying budget friendly, I found these Martha Stewart sconces at Home Depot. I like the look of individual sconces instead of one giant light fixture. Had we had a bit more room, I probably would have put them more on the side of the mirror, but they work well above it.
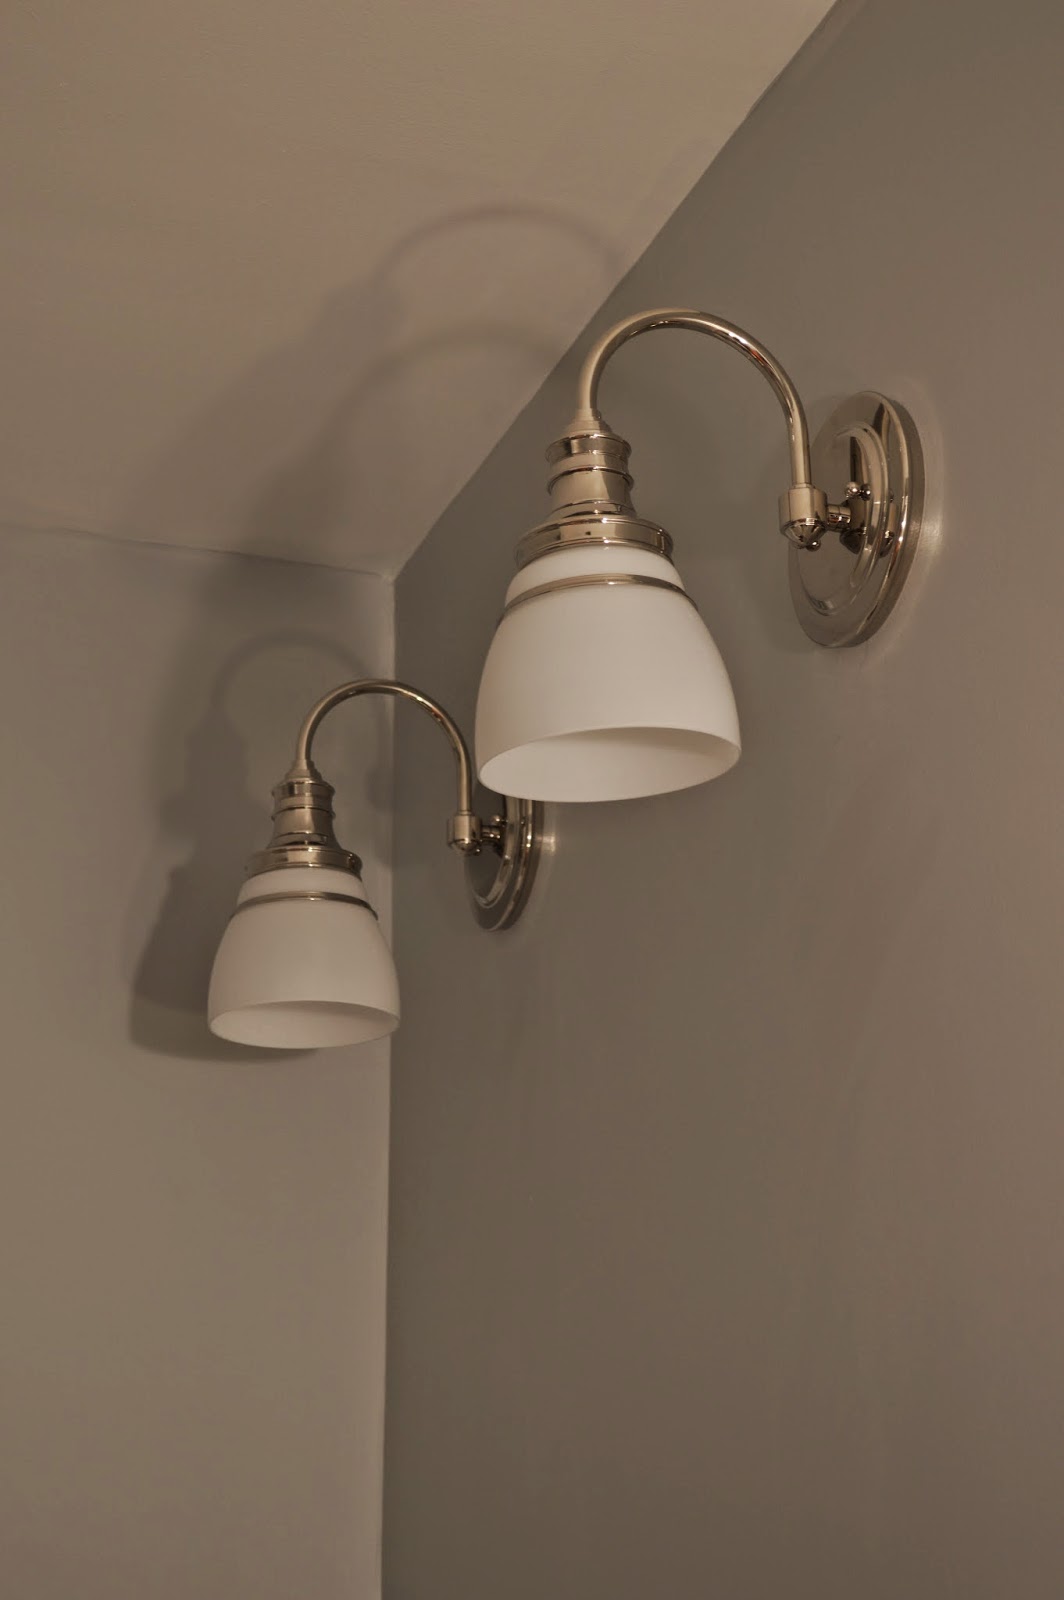


Nathan then installed some mounting clips for the mirror and hung that bad boy up. Looked good as new- even though it was reused!


We framed out the mirror before the board and batten. I believe the boards were either 4.5" or 5" wide. The below picture shows a happy Nathan seeing the light at the end of the tunnel.


We actually ended up adding a bit more trim to the mirror, but below is the basic frame-out before any spackling, caulking, or painting. 
 
 
Here's a before and after of the new vanity wall. After picture is pretty dark I know- but I had no time to edit these :)   
 
Hope you're liking the progress. End is in sight!
 
-Tricia
 

Sunday, May 4, 2014

The Bathroom Gets a New Layout

I'm so excited to say that the bathroom is coming right along- relatively speaking it's probably one of our quickest projects to date. I'm especially thankful for such a hard working husband and helpful father in law who have kept this project moving. I think Nathan's speed and dedication is due to the fact that he probably doesn't want to witness his preggo wife have another emotional Jessie Spano "There's No Time... There's Never Any Time" breakdown. I've only had 2 during the bath reno so far but hoping I'm in the clear.


Before I get to the good stuff like tile and grout and paint (Yes that is the GOOD stuff), I've got to get down to the bread and butter of the project. To truly appreciate it, you have to know all that has been involved. The bathroom isn't just a facelift- it's a full tear out and switcheroo of everything. The old layout did not utilize the space well at all. The bathroom is actually quite large- especially for a house this old- so we are lucky to be able to work with a lot of real estate.
 
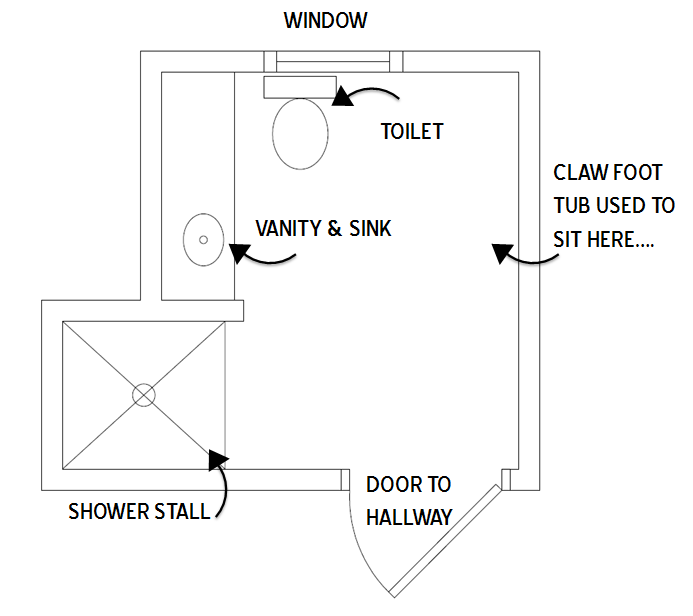
Below is a simple plan of what the bathroom was like before.
 
BEFORE
 
 
As you can see, half of the bathroom wasn't even utilized. Granted- we did take out the claw foot tub which took up a lot of the room, but we were left with a toilet practically sitting on top of the sink (You could seriously wash your hands while on the toilet. I swear I never did that though... not to say others haven't....), a vanity that wasn't able to be fully utilized or accessed due to the placement of the toilet, and a small shower stall in the corner. If I had to guess what the original layout was back in the day, I would assume that the toilet was where the shower stall is and the vanity and claw foot tub were where they are shown above. At some point the previous owners wanted a shower stall in addition to their tub, and just moved the toilet to the only place available- right smack in front of the vanity.


My vision for the new plan was pretty straight forward from the beginning. The main goal was to get rid of the nasty shower stall and install a tub/shower combo for kiddos, resell value, and practicality. We thought about simpler options like keeping the vanity where it was and going back to the original 1920s layout, but it just made sense (although maybe a little more work) to put the new tub where the old vanity was, move the toilet to the old shower stall area, and place a new vanity where the claw foot tub used to be. Had we put a new tub where the old claw foot used to sit, we would have probably had to build out a wall to enclose it and it would have made the bathroom feel very closed in. You also would have entered the room and be straight smack in front of a new wall... and I didn't like the thought of that. So, extending the original wall on the opposite side just made sense.  Now is the point that you are probably confused. If so, just look at the new layout below.
 
AFTER
 
Hope the new layout above is clearer than my rambling. We feel like it's a much better use of the space and it just feels right when you walk into the bath. It's a little tight between the tub and the vanity, but it's actually not out of the ordinary of a normal bathroom- I think we are just used to such an open room that it's a bit of a shock for us to have a normal layout. One thing that we are adding which I'm really excited about is the closed storage- aka linen closet- behind the toilet. We currently don't have a linen closet- just the hall closet that is already filled to the brim with random things- so it was really necessary for us to add in some storage.
 
Another thing we did was board up the window. I know I know! I would never normally take a window out of a room BUT we had good reason. The window would have cut directly into the new tub area and made everything look completely unbalanced. It could have worked, but we would have had a ghetto shower rod up against a window (that could never open) and then we would have half of a window in our shower. MOST OF ALL, the window is literally 4 feet away from our neighbor's house- which means it's 4 feet away from our neighbor's window. Needless to say, our blinds were never open when the window was there- in fact sometimes I forgot we even had a window in our bathroom. It was never used and even if it was the natural light was minimal since the house next door pretty much blocked any semblance of sunlight.  Operation 'board up that window' was a no brainer and  neither of us are regretting the choice at all.
 
Below's pic shows the window before demo. I guess I was really bad about taking "During the Reno" pics since this is the only one I could find before it was drywalled over.
 

After our Demo (which you can read here), the guys reworked all of the plumbing- which is pretty impressive if you ask me (Sorry no pics of that...) The basement ceiling is now a maze of new white piping- it's pretty awesome. Nathan also ran electrical to the wall that will be housing the new vanity.
  
 
We also extended the wall out so we could enclose the new tub (where the vanity used to sit)... which then led us to laying concrete board on the floor... 
 
 
And installing the new tub! It's in- it's really in! (and yes these are the worst iPhone pics ever)


Drywall was then installed.... Josh was a huge help with this part- he can do it with his eyes closed!
 
This is where the toilet and closed storage are going.
 
Future vanity wall


And then concrete board was installed around the tub....


And that's where I will leave you- Plumbing, electrical, tub install, drywall, concrete board... This post sums up about a week and a half of very hard work. I guess I could have spread it out, but just getting a blog post up is work enough.  The fun stuff (for me anyway) will be coming up in the next bathroom post- stay tuned!  
 
-Tricia