Showing posts with label Kitchen. Show all posts

Tuesday, September 22, 2015

The Parts of My House That I Do Not Like

OK. So that title does sound a bit negative, but I promise this post has a positive spin! 

I'm here to let you in on the parts of my house that I just do. not. like. I'll venture to say that nobody is completely happy with their home. You may have inherited a college house with college furniture (there is literally a Led Zeppelin bar stool in our kitchen- can I just please GET IT TOGETHER and cover that thing?) or the couch you are sitting on is 30 years old and smells of your great aunt Helen or you're living in what feels like the most #basic apartment ever... For most people there are parts of your home that just make you want to curl up in a ball and cry. And while there are many spaces in my house I do LOVE-  below are some of the parts in my home that I would like to chuck to the curb and start completely over.  

+ The Astroturf front porch. Yes, I said Astroturf. My 85 year old neighbor has it as well and while we both agree it's comfortable on the feet, I could personally do without. However, the stuff is GLUED down and I don't think it's coming up in the next 20 years. We're just living with it and trying to find anything that complements what I would best describe as a "neon grass green with touches of a Hi-Glo tint".


+ My big bulky beige monster of a couch. Nathan bought this at the beginning of the house renovation because he needed a couch. It was probably a bad sign when the furniture salesman referred to the giant thing as a "Video Gamer Couch". That's all that needed to be said for Nathan and it was out the door with a "SOLD" tag. I don't think it's going anywhere anytime soon. I'm not going to lie... it IS the most comfortable couch in the world, but it's really hard to work with design wise. Exhibit A below.


+ Our guest room. Remember when we painted our guest room navy? (which I do still like) and then I painted the desk coral? Well that coral desk actually smells and is STILL tacky. I don't know if it was a bad batch of paint or we did something wrong. But I'm over the desk and over the trendy color scheme. At this point, I'm just holding out until it becomes Max's big boy room and I'm storing a bunch of junk in there in the meantime. 


+ My dining room chairs. OK this one started out as a big dislike, but they have actually grown on me and I intend to keep them a little longer... maybe eventually have them recovered? These chairs are AT LEAST 25 years old (from my aunt and uncle). I sat on them when I was like 4 and I still sit on them and I am 29. #Math


+ My kitchen floor. While it's a perfectly good kitchen floor, I wish I would have put more thought into this one. This was one of the FIRST decisions we made and we literally just bought the cheapest tile at Lowes. We didn't have the money for an entire first floor of hardwood  (and we didn't know what kind of hardwood we wanted) so we decided to go with tile for the kitchen. There are no plans to do anything with this floor, but sometimes I wish we would have done something different.


+ My entire unfinished basement/laundry room/prison toilet situation. Enough said.

Yeah there isn't going to be a picture of this one.  

I'm sure I could come up with more, but those are the main ones that basically make me want to pull my hair out. But here's the positive spin...  not only have these things made me realize what I want to avoid in a future home, but it's causing me to work with what I have. Hopefully this encourages you to do the same and to not be so discouraged with your own home.  Maybe I'll  come back with some posts about how to  work with these so called problem areas. #RealLifeHouseProbs

This post is not intended to come off ungrateful. I am blessed to call this my home and to have a roof over my head, but it's here to remind myself that there will always be aspects of my home that aren't all that great- but you just have to embrace them anyway and make the best of things... yes even Astroturf. 

Did someone say free Putt-Putt?

-Tricia 

Wednesday, July 29, 2015

Brightening Up our Kitchen


Get ready for a long post.... Can you tell I like to write?

We have recently made some subtle updates to our kitchen which I am very excited about!


Our kitchen install started about 4.5 years ago. Crazy right? (You can see one of my firsts posts here) I didn't have much of a design plan other than the space planning, but we went pretty neutral and generic for resale value. Nathan and I weren't even engaged when the boys started tearing everything out and building the cabinets. I naively had this thought in my head that once we did get engaged and married, we would probably only be in this house for a year before we moved onto something bigger and better (cue God laughing) However, a wedding, 3 years of marriage, and a 1 year old later- we are still here and loving it! With no "For Sale" sign in our front yard who knows how long we will be here!
 

Recently, I have been wanting to freshen some things up, so I started analyzing our space and realized that the kitchen needed some updates to not only brighten the space but reflect more of my style. I'm really into the farmhouse style (Not surprising since we have an awesome farmhouse table that my husband built 3 years ago). I love the look because it's causual, yet classic. Honestly though, I think I love it most of all because I can embrace the craftsman style and warmth in my home. For so long I have seen nothing but all white everything (which I do LOVE- have you seen my bathroom?), but lately I have seen a lot of designers incorporate natural finishes. It's been eye-opening and refreshing to me since I am drawn to warmer tones- and my kitchen has a lot of it.  
 
 
Not to say that I wouldn't love to one day paint the upper cabinets white to make things a little brighter, but Nathan spent months building, sanding and staining those bad boys so the option to cover them up really isn't on the table. I've decided to keep them in their natural wood state and embrace the farmhouse style; it's proven to be a fun challenge. The changes are subtle and not perfect, but they really have made a difference and have made me appreciate what I have without throwing paint over it (Which I am so not above doing). The kitchens below have been my inspiration- they make wood cabinets look so so GOOD and I feel like all of these looks are very achievable.
 
Love the black hardware on those cabinets. Also did you notice the wood trim around the window looks so fresh since everything else is so light and bright?
Original Source here.
 
Joanna Gaines DUH... She never fails.
Original Source here. 
 
Wood and white- this is so beautiful. Love those cup pulls on the chestnut cabinets.
Original Source here.
 
 
The first simple update we made was painting the walls a nice fresh coat of white- the original color was more of a beige (So much beige)! The small punch of white really refreshed the space and helped balance out a lot of the wood finish.


I also moved the chalkboard to the outside encasement of the refrigerator, and added some white framed prints where the chalkboard used to be. After looking at these pictures, I think the prints need to be a bit bigger. Hmmm.


Love this view!


One of the best updates we made was lighting. After a LOT of convincing- we replaced our ceiling fan with this awesome Ballard Design pendant over our mobile island. Nathan loves ceiling fans so it was tough to convince him of this NECESSITY. We made a deal that as long as the living room would keep its fan, we could lose the fan in the kitchen. I had my eye on the Hadley pendant for a long time (we even thought about welding our own!) but then our friends were at the Ballard Design outlet and spotted this on clearance so they snatched it up for us. It is a bit smaller than I intended, but I still think it works and makes a world of difference!!!! I go back and forth about what light bulbs to put in, but I'm digging these right now.
 
 
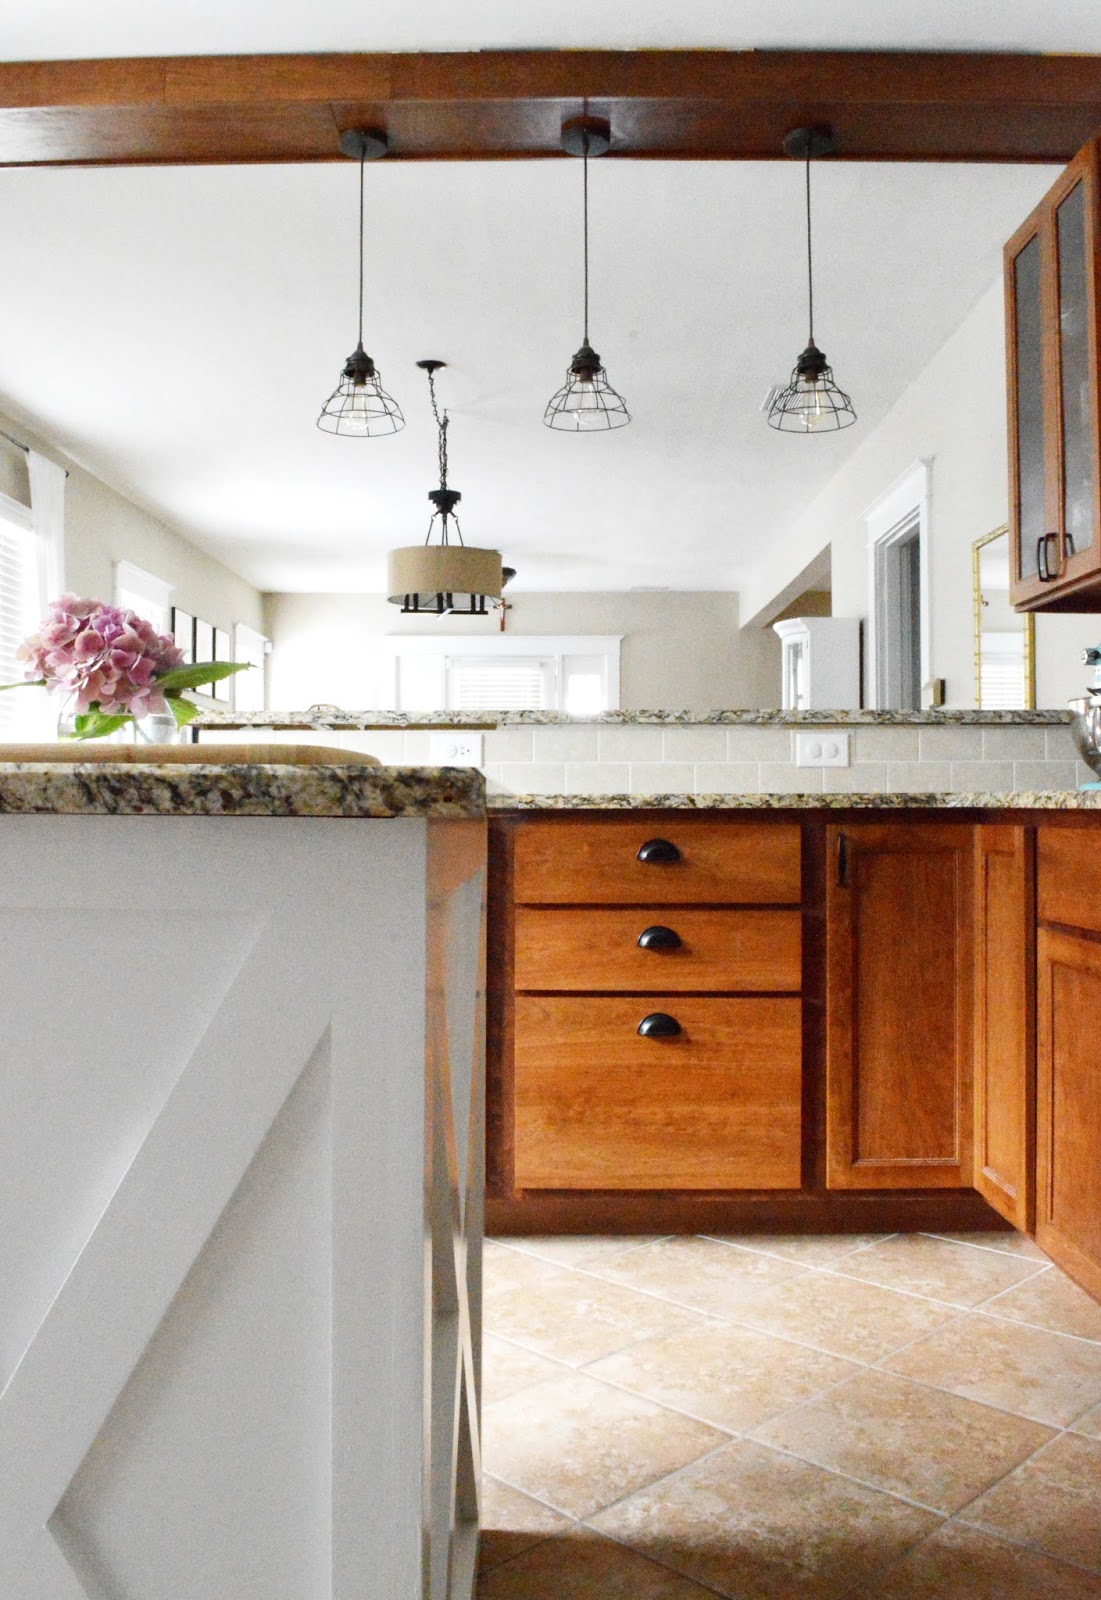
I originally had some simple white shades on our pendants from Lowes. I liked them, but they were ALWAYS crooked  (which drove me crazy).  I also wanted something a little more industrial. We found these new fixtures from Lowes. Since these fixtures were compatible with the original pendants, it was not a big deal to switch them out. They are now one of my favorite features in the kitchen. They definitely reflect more of the farmhouse vibe I'm going for.  


Another update was adding cabinet HARDWARE. How in the world we waited this long, I have no idea. I seriously couldn't even get into some drawers without breaking a nail. It was SO ANNOYING. But in our lazy state, we just let it be. It was one of those things where we were living that way for so long, we didn't realize what we were missing. But guys- cabinet hardware is really helpful. It was created for a reason- to get into your cabinets. Wow. Who knew?  


The only good thing about waiting  so long for cabinet harware was that I took my time contemplating what kind of to get. I finally opted for a black finish. My husband (and mom) were very apprehensive when I told them what I was doing- but once they were on it really completed the farmhouse look I have been going for. The inspiration images above helped with my decision!


Last but not least was actually one of the first updates we made. We originally had an open cabinet that was intended for a wine rack. It was put on the back burner for a while- possibly out of laziness or the fact that we really don't drink a lot of wine. When we realized we didn't even have enough wine to fill our imaginary rack, I started thinking of other ideas.  And then Max was born and we quickly realized we needed a LOT more storage for all of his goods (bottles, pumping parts, baby food, etc) I decided to remove our white dinner dishes from their cabinet and turn it into the baby zone. We then converted the intended wine rack cabinet into some open shelving.


I was pleasantly surprised with this update. Not only are we utilizing all of our storage space, but the white dishes brighten up the otherwise dark, wooden corner. I wasn't sure how I would like the open shelving concept, but we use our dishes so much that nothing really gets dusty. It's also much easier to grab dishes (especially when holding a 20+ pound "baby"). Talk about first world problems- the thought of opening a cabinet door has become too much for me. Sigh. But seriously folks, it really is a nice feature!

There are still some items I would like to check off such as a light above the kitchen sink, a bright runner, and a window treatment. I would also like to get some new barstools, but that's not really in our budget right now. Hopefully I'll run into a good deal down the line or find some thrift items to makeover.


Hope you enjoyed these updates as much as I do. What are your thoughts on embracing wood in your kitchen or other parts of your home?

-Tricia

Thursday, November 21, 2013

Give Thanks

 
With Thanksgiving just a week away, I thought I would share a fun update we made to our kitchen. I'm still a sucker for chalkboards anywhere in a house, so after I made the chalkboard below for our friends' dessert table at their engagement party (Treat Yo Self!), I figured this was the perfect size and canvas for our new kitchen addition.
 
Oh and I also want to make note that I've made true on my promise to hold out on Christmas décor until after Thanksgiving! Although... I am listening to holiday music pretty consistently. 
 
 
Above: We had some leftover wood from our cabinets so I sprayed the board with chalkboard paint and then painted a gold border inset about an inch.  
 
Although the gold worked perfectly for the party, I wanted more of a blank slate for our house- so I painted over it with some chalkboard paint I bought at Michael's. FYI: Chalkboard Paint provides a much better (and smoother) outcome than Chalkboard Spray Paint.


It provides a nice little reminder every morning before work.


Hope you have a great Thanksgiving. Looking forward to posting about some Christmas décor soon. Enjoy your turkey!
 

-Tricia

Monday, October 28, 2013

Everyone Needs a Last Minute Pumpkin

 
Whether you've been decorating for fall since early September (guilty) or just now getting out the pumpkins, everyone could always use a last minute décor DIY. Yes-  I said everyone!
 
This was one of quickest holiday projects I have done. All you need is a foam pumpkin, spray paint (color of your choice), and some brass fasteners or thumbtacks.
 
 
I picked up a box of  the small carvable pumpkins at the Dollar tree. Dollar tree = Cheap. Dollar tree = Awesome.
 
 
Then I spray painted a few coats....


Next up- the brass fasteners. I was originally looking for some gold thumbtacks, but couldn't find them in the store (or I was just too lazy to look in another aisle).  I found these brass fasteners and figured they would work just as well.


So then I just pushed the fasteners into the sides to create my gold and white polka dot studded pumpkin. Easy is an understatement. I think it would look great on a flat black painted pumpkin as well... or whatever color you choose!


I paired it with this miniature gold owl that I found in the fall décor section of Walmart.  


I also wanted to keep my autumn décor bright and fresh in the kitchen, so grouping it with white pieces and adding some texture was a no brainer. I have no shame that those are fake flowers... Who can seriously afford real flowers all the time?
 
Also, the white bowl above is one of my favorite flea market finds from Somerset. It's so versatile (and nice to look at).
 
 
One of my favorite looks is natural texture and white finishes- I've had these wicker orbs for years.
 
 
How many pictures can I take of this tiny area on my kitchen counter? More I tell ya.


I think I'm officially done with fall decorations... Going to try to hold out until Thanksgiving before I start on Christmas. But let's be real- that's not going to happen!
 
-Tricia

Tuesday, September 3, 2013

From College Parties to Dinner Parties: The Kitchen Part 2

Let's get back to the kitchen....

Kroger's Special flowers never fail.

I gave you all a sneak peak (above) in part one of the kitchen renovation post last week. There you can see us getting down to the original wood studs and the many steps we took to get this transformed into a functional kitchen. I'm sure you also didn't forget those glorious 'Before' photos that I imagine you'd rather not see again. I apologize if you were traumatized by any of those images.  

But in order to see any After photos, a Before is just necessary. #SorryNotSorry #Hashtag.
Here's a lovely Before... kegerator, red bull, blurred out chalkboard and all.

 Beautiful sight.

And here's an After....

Same angle as the picture above. This shows how much room 
was added by tearing out the pantry and pushing the wall back. 
This picture also makes me hungry.
 
And here's another Before: 

 Hot sauce anyone?

After... Not the same angle but hopefully you get the picture.


Tearing down the wall was a definite game changer.

 Once the granite and sink were installed we were able to purchase some awesome GE Appliances at the local Scratch and Dent. I would HIGHLY recommend checking out a Scratch and Dent if you have one in your area. I was amazed at the quality and quantity of the appliances that we could choose from. We were even looking for a specific size refrigerator to fit a tight space and we found it right away. Thankfully, we've had no issues with any of our appliances and most of the 'dents' are minimal and actually hidden by cabinets so we lucked out. They all came with GE warranty too so that was an unexpected bonus. After some researching online, we also found a perfect range hood from Amazon with great reviews and an even better price. We ordered it about a week before Christmas and it was here within 2 days.... Crazy! The customer service was also really great to work with. 

Don't mind the empty cabinet with no door.
That is our future spice rack cabinet- once we get to it.

We also found some white pendant lights for a VERY low price at Lowes. I literally walked in and walked out within 10 minutes- sometimes you just know what you're looking for. I wanted something light, fresh, and clean to contrast with the warmer wood tones in the room... and also something that wouldn't be hard on the wallet.

Still have some trim and patchwork needed, but we're getting there.
The above beam was needed to transition between the original plaster
and the new drywall ceiling. PS. This bar area is essential.

The white mobile island was the latest item to get finished earlier this summer. After the granite was put in, we had the installer cut a rectangular piece with what we had leftover. An island had always been that next thing we needed to give the kitchen a more finished look. Nathan and Josh (I feel many posts will have a Josh mention) were able to build it in his classroom workshop and it's become one of my favorite pieces in the kitchen. My main request was that it had a classic "X" detail on each side and that I could paint it white. I absolutely love it... the fact that it is mobile and the casters are hidden makes it even better.  

 Looks like there may be a window treatment post in my future.


Now, you would probably assume that the kitchen was finished, but Nathan wants me to put in a disclaimer that we still have several items we need to tackle, so in order to keep my promise... Disclaimer: The 'big' stuff is done, but there are several more tasks that need to be completed. Sometimes the smallest and easiest things are the most annoying to tackle... especially once you get used to living with them. Examples being the spice rack cabinet by the range, wine rack, hardware, top trim, base trim, and molding.... along with tons of other decorative ideas that I want to take on soon... window treatment, pictures, etc. The work never ends, but we're very happy with our progress so far.

Lemonade or Margaritas?

Future wine rack cabinet in the works...
Our lucky fridge we bought from Scratch and Dent.

My second go at a succulent. First one died due to lack of green thumb.

As you can see, we decided to go with classic wood tones and neutral, light finishes.  Nathan is an outdoorsy guy and loves the look of natural wood and let's be honest- I think any guy shutters when they hear anyone mention the thought of painting over wood. (However, I'm a big supporter of it if that's what you like). I really just went with my gut when it came to deciding which route to go. I think its important to stick with the true character of a home and I think the finishes really fit the house and its 1920s Craftsman style. The warm wood tones really work for us and they also help complement a lot of the white trim, drapery, and accents throughout the first floor. It's definitely the warmest and most used area of the house. 


I may take my love of clean counters to the extreme.

 
Nathan's bourbon cabinet... with Charlie Strong Maker's Mark as a staple.
  
By taking our time and being patient, we really saved a lot of money and put in a TON of value into our home. We have found recently in our neighborhood that if you have a great kitchen and bathroom, the house won't stay on the market for very long. Speaking of the market- Resell was a big focus when beginning the transformation. My less experienced 'real-world' mind thought that we would live in the house a few years and then find something newer and better. Uhhhh reality check... 1. It ain't that easy when it comes to money! and 2. Why in the WORLD would we put in this much work into something and then not enjoy it? Not only that- the more things get done here, the more I don't want to leave. It may be inevitable at some point in the next 3-4 years, but the "re-sell" mindset has been put on the back-burner. I think we've both decided to really start enjoying living in this house and stop thinking about 'the next big thing'. 

Here's another Before:


Happy to report that those tan window treatments are now gone.


After....

Bottom trim coming soon.

Before....

I'm out of words.

After...


I may sound like a broken record, but as you can see from the Before pictures, it's not even close to what is used to be. The old kitchen consisted of orange oak flooring that would bubble up from water damage, 1960s cabinets that were falling apart, and the countertops that didn't match. And overall, it really just screamed to me, "Saturday morning after a big college party". Good times.


We really learned a lot from our first big project. I know Nathan expressed that he would rather purchase than build kitchen cabinets in a future home, but he's glad he can say he's done it. (I would imagine Josh also has that same sentiment). I think we're just proud that we had the patience to see it through and were very sensible with the purchases we made. Naturally, it's probably my favorite place in our home (so far) and has proven to be a favorite of our friends and families as well. Looking at these pictures reminds me that the times have surely changed in the past 5 years. It's crazy to think where we are now in our lives and in this home. We definitely had some great memories in this kitchen particularly, but change is inevitable... and I think this was definitely for the better. So while the college parties may be a thing of the past, we're happy to announce that the dinner parties are in full swing... with the Red Bull/Vodka now being optional.


Now I need to work on some of my newlywed cooking skills.

-Tricia