Showing posts with label Rustic. Show all posts

Wednesday, October 23, 2013

Bathroom Plans for the 'Meantime'....

These past few weeks have been just a little busy, so we haven't been able to make as much progress on the house as we were planning. Honestly, it's been kind of nice to take a break from projects because sometimes you just need to refuel- am I right? However, I'm planning to have a Built In-Mantel-Conglomeration update next week so I guess we should be getting back to work... 

In the meantime, I thought I would give you a little update on some bathroom plans. I should rephrase that... it's our 'bathroom in the meantime' plans.

Our current bathroom is less than desirable. As most of you are aware from here, I inherited a college house bathroom the moment we got married. It's functional... but not at all beautiful. Not only that, but it took me a while to get over the funk of moving into a house that used to shelter college boys. I think it was a year before I was finally comfortable using it....and that is no exaggeration.
 
Anytime people ask, we've told them that our bathroom is next on our list of things to tackle. I'll get into the current bathroom details later on, but we really want to do a massive overhaul (plumbing changes, new vanity, installing a tub- all the works!) but then life happens. It seems like the moment we decide to go forward something pops up that prevents us from breaking out the sledgehammer or we have a Dave Ramsey moment and realize that a bathroom overhaul is not necessary RIGHT NOW. And I'm OK with that- because like I said our bathroom IS functional, but I'm still really needing a change. I'm willing to hold out on a new bathroom for a year or so if we can do a mini makeover to hold us over. I'm well aware that the power of paint can do wonders and for once I would like to NOT be embarrassed when guests come over and use our bathroom.
 
Since it's only a 'mini-makeover' I wanted to do something a little different... a mix of rustic/modern with a touch of industrial. It's actually the opposite of my DREAM bathroom of white, crisp, and clean, but a style I'm really drawn to. Just one of many DREAM bathroom examples can be seen below:
 
 
I'm sure you all remember that I love some touches of rustic from this post and I thought it could be fun to do something a little different before I do break out the sledgehammer and fulfill my vision of my 'white spa' bath. If I'm going to do my dreamy bathroom one day, I'm going to go all out so this temporary solution just gives me an excuse to try something a little different. It's more fun this way anyway!
 
After looking at countless images of inspiration, I put a design board together a few weekends ago. Let's be honest, even the design board is a stretch since it includes some high dollar items, but it helps put my vision together. I'm wanting to try to stay under $200.00 for the temporary fix so I'll be keeping my receipts to see if I can meet the challenge. Lots of DIY ahead!
 
 
Yes- you do see a chair and table for the bathroom. The room is actually really large since we removed an old (and gross) clawfoot tub, so putting some extra furniture in there is not out of the question to balance it out (and cozy it up).
 
Below are some of my inspiration pictures.
 
 
Is it odd that this bathroom reminds me of my wedding colors?

 
but you can see the touches of industrial and rustic throughout.  
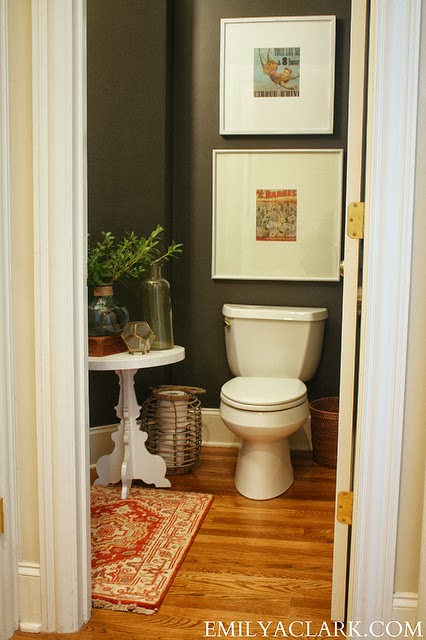
And my favorite blog ever- Emily A Clark shows her dark walls and yes- furniture in the bathroom. Love how that side table cozies things up and makes the room more interesting.
 
What do you think- do you like the dark for a bathroom? And the rustic/modern look? I can't wait to break out some supplies and paint all of the college boy out of that bathroom! Can't believe it's taken this long!

-Tricia

Monday, September 23, 2013

Dressing Up Your Table for Fall

The moment labor day weekend ends, I'm immediately ready for pumpkin flavored anything, football games, and 60 degree weather to begin. But come on, who isn't? Unfortunately, it doesn't happen that quickly in Kentucky, but we've been lucky to have a few 'fall-like' days here lately which has gotten me in the spirit.
 
One of my favorite things about this time of year is the decorating. (I'm sure I get that from my mother). Ever since we got our farmhouse table, I've been looking forward to this season because I knew exactly how I've wanted to decorate it and couldn't wait another day to get started....


I wanted to utilize the whole table (since it's massive), so Nathan and I made a long, narrow box that would work as the foundation for the tablescape. And yes- when I say 'Nathan and I', I mean that I ACTUALLY helped construct something. Shocking, I know.
 
It was a simple construction that included a nail gun, wood glue, and 1" x 4" boards. We then used some of the leftover stain that was applied to the kitchen cabinets and it was good to go. The box is great because I plan to use it all year round... Christmas centerpiece, Hydrangeas in the spring- lots of possibilities!


The easiest box ever!
 
Last weekend, Nathan and I made a trip to one of our favorite places, Huber's Farm. I think we were there three Sundays in a row this past summer because we love it so much... and we were trying to get some time in before the crazy crowds come in the fall. Too. Many. People. (That all just sounded very hipster... sorry about that). Anyway, while there enjoying some wine tasting with his parents, I was able to pick up some mini pumpkins and gourds for a good price (at least I think they were... not really sure what mini pumpkins go for these days....) I originally planned on using some fake pumpkins I had for the table, but couldn't pass these up in all of my Huber's loving glory. I then picked up some floral foam, candles, and Spanish moss from Walmart (Yes, I cheated on Hobby Lobby). The final thing I needed was some fake fall foliage thingys... I luckily already had a good amount that I have collected throughout the years, so I only had to pick up a stem or two for the project.
 
The supplies....
 
This project was really simple. The box is about 4" deep, so I made sure to add foam at the bottom to ensure the pumpkins could sit higher and weren't buried below. I simply cut the foam in half and placed the pieces in the box. I then added and spread out one bag of Spanish moss on top. From there, I spaced out my pumpkins and gourds until they looked nice and balanced.


Next up- the candles. I had 4 tapered candlesticks and a few pillar candles. I guess I wasn't thinking about the height of the pillar candles, because I ended up having to cut into the foam and place the candles into the holes I made. It ended up working pretty well though because they were then secure and not wobbly on top. I then finished it off by pushing the tapered candlesticks into the foam and we were good to go.


Finally- the fun part. I grabbed the fall foliage and a scissors and got to work. I cut each stem of the foliage so I could disperse it all throughout since I only had one 'branch' of each.
 
 
I really just messed with the foliage until it looked right to me and placed the pieces in between and over the edges. It ended up being exactly what I was going for and I'm loving it.


Sorry for the picture overload... I'm still messing around with my camera. 

 
This project was very quick and easy... including making the box. If you're not up for tackling wood with a nail gun, I think this could work just as well in a long narrow basket that you could pick up at any craft store, flea market, or even the dollar store... which is my other favorite place to shop. You'd be surprised at what The Dollar Tree is hiding!

Here it is all lit up... I'm trying to not light it all the time to avoid having to buy more candles! Oh and probably a major fire hazard. Oh well- it's pretty!


Hope this gets you in the mood for the fall season! I think my next project for the table is a light burlap runner to break up all of the wood that is going on. Hope you come back and check it out!


-Tricia

<a href="http://www.bloglovin.com/blog/10387815/?claim=yw7xnh67n49">Follow my blog with Bloglovin</a>

Monday, September 16, 2013

From Farmhouse to Our House: Dining Room Table


Last December- after a long first week of work at my new job- I walked in the door on a late Friday afternoon to an early Christmas present....
 
A farmhouse table!
 
I can handle these surprises....
 
I don't know if I was more shocked at the beautiful piece of furniture in front of me, or the fact that Nathan tied a really great bow on top. The guy is a great gifter. You may think he's sleeping on the couch- ok maybe he is- but he's really good at listening to those little things I unassumingly mention... or notice my eyes get big when I'm scrolling across something on the computer screen. Meanwhile, I'm over here trying to find something for his birthday that's neither a man tool or car part. Why are guys so hard to buy for?
 
Check out that bow!
 
His dad was able to salvage some wood from a barn on Nathan's brother-in-law's family farm in Nancy, Kentucky (close to Somerset where he is from). I love how the origin of the table traces back to the area where Nathan grew up. It definitely makes the piece more interesting than a few pieces of lumber from the hardware store. All of the wood- even the legs- came from the barn so there was no need to buy any extra lumber. You can even see some of the old nail holes in some of the planks.


To keep it secret, Nathan utilized Josh's workshop...and his help of course. (Told ya there would be more Josh mentions.... they must really enjoy their male bonding time) There also wasn't a need to stain the wood. One side of the wood was very faded from facing the sun, but the interior side was still a rich, dark color. He made sure to utilize that side for the table top. (I bet the faded side would have looked just as good with a great sun-washed look) From there, a clear coat was sprayed over the entire table.


Removable extensions were also constructed. They aren't that heavy and they easily slide in and out whenever we need them. They are just inserted in the slots that were cut into the frame of the table. We've already utilized these quite a few times and are able to sit at least 10 at one time... with a maximum of 12 if you put two people at both ends. Who's cooking?
 
Slots were cut in the frame of the table.


Added extensions....
 
This table is huge... Go Big or Go Home...
 

It's great that we don't have to be too careful with it since a few dents and dings will just add to its character. I have to say- my favorite parts are the details of the knots and the natural edges- they really show the table's history and roots. Yes that was a pun.


It's without a doubt the most "rustic" piece in the house... but I think it really fits us to the tee. Nathan is just manly and rustic (He'll hate me for writing that... haha) and I'm always wanting to have some warmth in a space which this definitely provides. I have a feeling tablecloths may be used once kids come into the picture to avoid crumbs and messes in the cracks- but right now we tend to keep it pretty clean. I will admit I have used a vacuum hose for a few areas holding crumbs, but I usually just use a damp rag and it's good to go.
 
Now that we have this awesome table- it leads me to chairs. I'm currently living with some that I'm not the biggest fan of, but they're working (and pretty comfortable I might add). I have some pretty cool chairs in my mind, but I'm trying to keep the budget at the forefront before I make any drastic purchases... made that mistake before! So I guess in the meantime I'm in search of some new replacements... and by 'new' I mean something I can find for dirt cheap to recover and makeover! Stay tuned.... 


-Tricia