Thursday, October 31, 2013

The Mantel is (Finally) Up!

I can tell you (in my mere 2 month experience) that the one bad good thing about having a blog is that you're accountable for what you post (it's part of the reason that I started this thing). Last week, I mentioned here that I would be giving you all an update this week on the Built-in/Mantel situation that we have going on. Well, I like to stay true to my word so we FINALLY got the mantel up earlier this week. I'll admit- sometimes projects lose steam. We come home from work and the last thing we feel like doing is nailing/painting/sanding. However, we're always glad when we pick ourselves up off the couch and git-er-done. Productivity always feels good.
 
We're one step closer to completing this project and I'm liking the results so far!
 
Here's the mantel I've been blabbing about....

 
 I'm dreaming of a Christmas mantel....
 
Here is where we started:


Drilled some holes to find the studs... apparently the studs were not spaced evenly AT ALL... hence the amount of puncture wounds. Oops! (Whoever eventually buys this house from us is going to be very confused!)


One thing I didn't think about (but Nathan did of course) was that the wall was inset so we needed to install a board for the mantel to attach to in order for it to overlap the bookcase trim. Duh! (Did that make sense?). We could have custom cut the moulding in order for it to butt against the existing trim, but this was a simple solution. It wasn't a part of my original plan, but it works. I'm not complaining.

Once the board was set, we added the cantilevers and the mantel top.


 The moulding was then added.


 Spackle, caulk, and paint finished off the look.
 
 
Having a blog also makes you stare at every detail...
Looks like we need to touch up on that corner. 


My handy husband pulled electric up to the mantel so I can have power access. (He HATES exposed cords so that pet peeve really worked in my favor). Can't wait to plug in some garland!
 
 
There ya have it! One step closer to completion. I refuse to style any of my bookcases until it's complete.... so I literally have piles of books, frames, and vases just sitting on my floor collecting dust- It's killing me! I do it to myself though.... it's all about motivation!
 
Can't wait to get a start on the lower cabinets!  
 
-Tricia


Monday, October 28, 2013

Everyone Needs a Last Minute Pumpkin

 
Whether you've been decorating for fall since early September (guilty) or just now getting out the pumpkins, everyone could always use a last minute décor DIY. Yes-  I said everyone!
 
This was one of quickest holiday projects I have done. All you need is a foam pumpkin, spray paint (color of your choice), and some brass fasteners or thumbtacks.
 
 
I picked up a box of  the small carvable pumpkins at the Dollar tree. Dollar tree = Cheap. Dollar tree = Awesome.
 
 
Then I spray painted a few coats....


Next up- the brass fasteners. I was originally looking for some gold thumbtacks, but couldn't find them in the store (or I was just too lazy to look in another aisle).  I found these brass fasteners and figured they would work just as well.


So then I just pushed the fasteners into the sides to create my gold and white polka dot studded pumpkin. Easy is an understatement. I think it would look great on a flat black painted pumpkin as well... or whatever color you choose!


I paired it with this miniature gold owl that I found in the fall décor section of Walmart.  


I also wanted to keep my autumn décor bright and fresh in the kitchen, so grouping it with white pieces and adding some texture was a no brainer. I have no shame that those are fake flowers... Who can seriously afford real flowers all the time?
 
Also, the white bowl above is one of my favorite flea market finds from Somerset. It's so versatile (and nice to look at).
 
 
One of my favorite looks is natural texture and white finishes- I've had these wicker orbs for years.
 
 
How many pictures can I take of this tiny area on my kitchen counter? More I tell ya.


I think I'm officially done with fall decorations... Going to try to hold out until Thanksgiving before I start on Christmas. But let's be real- that's not going to happen!
 
-Tricia

Wednesday, October 23, 2013

Bathroom Plans for the 'Meantime'....

These past few weeks have been just a little busy, so we haven't been able to make as much progress on the house as we were planning. Honestly, it's been kind of nice to take a break from projects because sometimes you just need to refuel- am I right? However, I'm planning to have a Built In-Mantel-Conglomeration update next week so I guess we should be getting back to work... 

In the meantime, I thought I would give you a little update on some bathroom plans. I should rephrase that... it's our 'bathroom in the meantime' plans.

Our current bathroom is less than desirable. As most of you are aware from here, I inherited a college house bathroom the moment we got married. It's functional... but not at all beautiful. Not only that, but it took me a while to get over the funk of moving into a house that used to shelter college boys. I think it was a year before I was finally comfortable using it....and that is no exaggeration.
 
Anytime people ask, we've told them that our bathroom is next on our list of things to tackle. I'll get into the current bathroom details later on, but we really want to do a massive overhaul (plumbing changes, new vanity, installing a tub- all the works!) but then life happens. It seems like the moment we decide to go forward something pops up that prevents us from breaking out the sledgehammer or we have a Dave Ramsey moment and realize that a bathroom overhaul is not necessary RIGHT NOW. And I'm OK with that- because like I said our bathroom IS functional, but I'm still really needing a change. I'm willing to hold out on a new bathroom for a year or so if we can do a mini makeover to hold us over. I'm well aware that the power of paint can do wonders and for once I would like to NOT be embarrassed when guests come over and use our bathroom.
 
Since it's only a 'mini-makeover' I wanted to do something a little different... a mix of rustic/modern with a touch of industrial. It's actually the opposite of my DREAM bathroom of white, crisp, and clean, but a style I'm really drawn to. Just one of many DREAM bathroom examples can be seen below:
 
 
I'm sure you all remember that I love some touches of rustic from this post and I thought it could be fun to do something a little different before I do break out the sledgehammer and fulfill my vision of my 'white spa' bath. If I'm going to do my dreamy bathroom one day, I'm going to go all out so this temporary solution just gives me an excuse to try something a little different. It's more fun this way anyway!
 
After looking at countless images of inspiration, I put a design board together a few weekends ago. Let's be honest, even the design board is a stretch since it includes some high dollar items, but it helps put my vision together. I'm wanting to try to stay under $200.00 for the temporary fix so I'll be keeping my receipts to see if I can meet the challenge. Lots of DIY ahead!
 
 
Yes- you do see a chair and table for the bathroom. The room is actually really large since we removed an old (and gross) clawfoot tub, so putting some extra furniture in there is not out of the question to balance it out (and cozy it up).
 
Below are some of my inspiration pictures.
 
 
Is it odd that this bathroom reminds me of my wedding colors?

 
but you can see the touches of industrial and rustic throughout.  

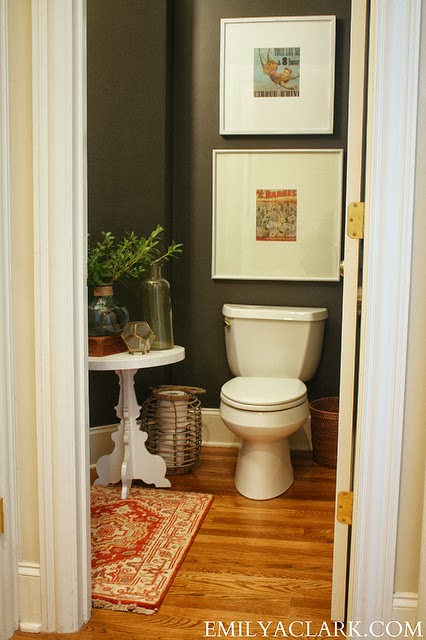
And my favorite blog ever- Emily A Clark shows her dark walls and yes- furniture in the bathroom. Love how that side table cozies things up and makes the room more interesting.
 
What do you think- do you like the dark for a bathroom? And the rustic/modern look? I can't wait to break out some supplies and paint all of the college boy out of that bathroom! Can't believe it's taken this long!

-Tricia

Tuesday, October 15, 2013

Runner Love

It's quite a busy week of work so here's a quick little post for your Tuesday!
 
I've been wanting a floor runner in our hallway for a while now, but I have avoided paying over let's say....  20 dollars?  I am seriously so cheap sometimes! Needless to say, I was very excited to come across this find when I wasn't really expecting it. We don't live far from a JC Penney outlet (who knew those existed right?) and as I was driving by I saw that they were having a store closing so I stepped in to see if I could find any irresistible deals. It was definitely hit or miss and the crowd was crazy (I swear people will buy anything if it says 30% off.... I guess I am one of them), but I eventually came across this chevron runner. I think it was around $13.00 with the discount. I snatched it up immediately because it's kind of exactly what I was looking for.... soft, neutral, a pattern... oh and cheap. 
 
 
I'm not chevron obsessed, but I do like a little here and there. I especially like this one because the chevron is thinner and the texture makes it a little more interesting than your basic bold pattern. Most of all, it just feels good on my feet.
 
Speaking of chevron, my sister in law just did an awesome chevron on her closet doors.... I'm hoping I can take pictures of them the next time we visit and then show them in a post. It's pretty awesome.
 
 
It's also not huge, but it does the job.


It's amazing what a rug can do to warm up a space. Find any good, unexpected deals lately?
 
-Tricia

Tuesday, October 8, 2013

The 'Guest' Room Gets a Paint Job

I thought I would break up all this built-in madness business and show you a little progress on another room in the house... the guest bedroom. Or as we still occasionally call it out of habit: Josh's room. (Don't worry- he moved out a few months before I moved in!)
 
No fault to Josh since he did not make the design choices, but this room was pretty rough. Just imagine bright baby blue paint and cream trim. Or you can just feast your eyes on the pictures below.....
 
 
I simply don't understand that choice of color and that trim makes me want to vom, but to each their own I suppose.
 
 
Gloriousssssssss!
 
When I think of my dream bedroom, I definitely picture light, serene colors and tones- however, when I started brainstorming for the guest room, I wanted to have fun with it and do something I wouldn't normally create for myself. So....... in steps some beautiful navy blue paint!


I swear I do things other than take the pictures!
 
I know a lot of people tend to shy away from dark colors in a tiny room, but some would be surprised to find that it doesn't necessarily have to make a room feel smaller. I think it all depends on what you use to contrast it... which I will get to in another post :) Luckily, our house has pretty tall ceilings and large windows which helped when we chose to go darker. We also promptly painted that cream trim a nice bright white and that has made all of the difference!
 
I took a few pictures with my phone once the room was completely painted, but I couldn't take any good updated ones because I've made some progress that I want to wait to share. Hopefully these will hold you over.


One of the many things I love about the house are its doors, trim, and hardware. They're not your typical builder basic pieces, so we definitely appreciate the quality materials throughout the house. I've seen a ton of blogs try to turn builder basic doorknobs into more of an antiqued brass look... Luckily those guys are already on our doors. They could definitely use some polishing, but they are just one of the cool perks of living in an older house.


It's amazing what paint can do right? Here's a sneak peak of what we've been working on since then....
 
Stay Tuned!
 
-Tricia 
 

Wednesday, October 2, 2013

Progress on the Built Ins... Phase One!

Well- we have made some progress on the built in/mantel/entertainment center conglomeration (that is what I am calling it now). If you're just catching up on this, you can reference back to this post which will give you a little background and inspiration behind this project.
 
Just a reminder, this is where we started:


This project definitely wasn't even on my radar until a few weeks ago, but it quickly jumped to the top of the "To Do" list... maybe because the holidays are coming and I'm dying to do some mantel decorating... or maybe because I knew it would be such a big (and much needed) change to the living room. Like I said before, I've been kind of stuck in that room so I'm hoping once this is done, it will help me get excited about the room (for once). We shall see.....
 
Clear it out!

 
The first phase of the project was pretty easy. Before we cleared off the shelves and unmounted the TV, we headed to Lowes to pick up some boards and crown molding. From there we cut the lumber per our measurements.
 
  
Too much trim to choose from..... Simple cuts made for the wall.
 

Two pieces would need to fit vertically from the top of the bookcase trim to the ceiling. The other piece would need to fit the width horizontally in between (If that makes sense). We then cut the crown moulding to span the entire width and overlap the vertical boards. We don't have much experience cutting crown, so it may have taken a bit longer than normal, but we eventually got the right angles.

Before we installed any of the boards, we broke out the paint and applied it all the way up to the ceiling- Nathan cut in and I rolled... aka: Nathan has patience for the small important details... and I like to see results quickly ;) Instead of applying primer, we just did two coats of white paint. It ended up being plenty and covered well. Painting the center wall already made a huge difference in the look of everything. It was easy to see the vision once that paint was on the wall.


Yep.... We just painted around the TV mount. Don't judge :)
 
I wanted to make sure the center wall looked like it was a part of the bookshelves and fit right in, so with our boards we continued the line from the bookshelf edge trim to the ceiling. This way, the top crown of the bookshelves looks like it was built over the center boards, making it appear like it was built in. I think continuing the existing lines, but making it look layered is key in trying to give it the feel of "Oh this has always being here" look.... if that makes sense.

 
We then nailed up the rest of the boards....


Once the boards were up, we applied the crown moulding with a nail gun where the wall met the ceiling and made sure the edges wrapped around the boards we just applied.
 
I swear the boards were not this dirty...
Something is wrong with the contrast in a LOT of these pictures. 
 
From there we spackled any nail holes that existed. Then Nathan took some caulk and applied it to the edges and any extra spaces where boards met.


Once dry, we gave the boards and edges a new coat of paint.
 
Nice and Fresh! Maybe the boards were that dirty! haha
 

So with that, 'Phase 1' is complete. This is where we are as of now:
 
We hung the TV back up and placed the stand where it previously was so we could watch some TV.... And that weird wire thing is our new antenna. Very high tech- I know.
 
Here is a side by side. Even this small improvement makes a HUGE difference in the room! I feel like the room is already taller and the wall is much more balanced. I'm excited for 'Phase 2'!
 
Such a huge difference!
 

The next step will be installing the mantel. We may or may not have messed up on the first piece of crown at the ceiling so we have an extra piece. To save money, we'll just be using that piece for the mantel since it's still plenty long for what we need.
 
Once the mantel is done, we'll start working on the lower center cabinet, doors, and detailing. It's not an overnight project (which I definitely prefer), but by taking our time and focusing on budget, I think it will be worth the wait.
 
What do you think? Like the progress so far? 
 
-Tricia